How to Setup Network (Lan) Between Xp and Vista Windows Pcs

Vista is Microsoft’s new operating system and it provides different network and security method than Windows XP, to its user. So in order to create network between Vista and XP, we have to enable few network related features on Windows Vista.
First of all we have to turn on “Network Discovery” service; this service allows us to see other network computers and devices from our computer and allows people on other network computers to see our computer. We can also access shared files and devices on other computers and other people can access shared files devices on our computer.
Next we are going to turn on “File Sharing” option. As name suggests it allows us to share folders on LAN. If you turn on this option, then you are also turning on the “Public folder sharing”. Public folder is the default share folder in Windows Vista like “Shared Documents” in Windows XP.
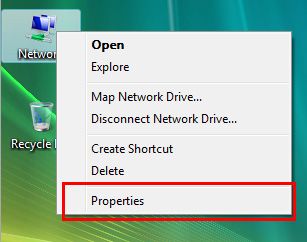
To turn on these features right click on Network and select properties. This will open “Network and Sharing Center” and do as marked in the "Vista Network Sharing Center" images below.
Click to view all images.
Vista Network Sharing Center (Click to Enlarge)

Now we will assign IP address to the Vista PC. In Vista we have two types of IP address, IPv4, IPv6. Windows XP also has IPv6 but you have to install it manually. We will use here IPv4 to setup networking between Windows XP and Windows Vista.
Networking with Vista is cakewalk; I assume that Windows XP as properly configured PC and assigned IP “192.168.0.1”, so we will assign IP address to Windows Vista. If you don’t know how to assign IP address in Windows XP then click here.
Now go to Network Properties of Windows Vista PC; this will open a window “Network and Sharing Center”.
Manage network connections
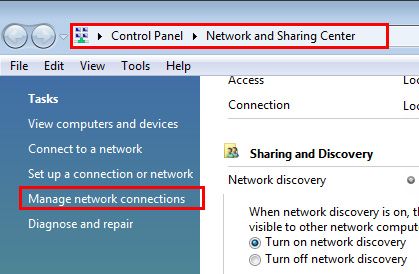
Now on left pane you will see some clickable links under Tasks Menu, click on “Manage network connection” link and It will open “Network Connections”. Here you can see you LAN card “Local Area Connection”. If you cannot see anything here then check your device manager or post comment here, I’ll try to solve that.
LAN adapter
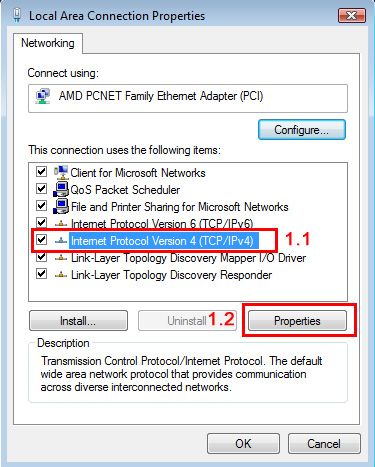
Now it’s time to assign IP address to this LAN adapter, right click on it, select properties. These will pop-up Local Area Connection properties; select “Internet Protocol Version 4” and click properties.
LAN adapter properties
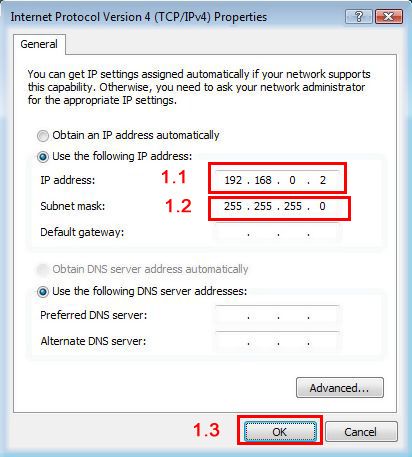
Type “162.168.0.2” in the IP address box and click “Subnet mask” box, this will automatically put the subnet mask address. Click ok and you are done.
IPv4 (TCP/IP) properties
But before you access lets ping XP PC from Vista PC to confirm connectivity. On Vista PC press windows key + R then type “ping 192.168.0.1” without quote and hit Enter key. You should see something like this.
Ping result

Check Firewall Settings
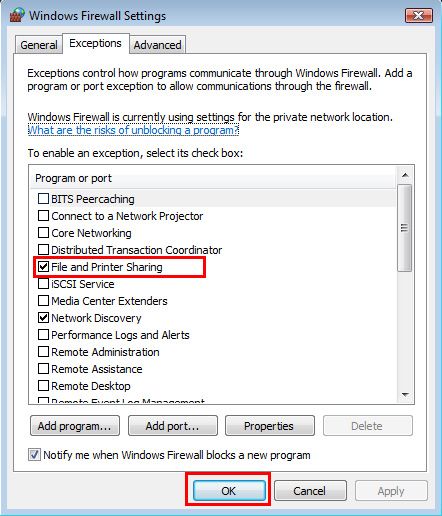
Apart from this you need to check that whether Windows Vista Firewall has created exception for file sharing or not. In my case firewall was blocking the file sharing option and I created a firewall exception in this way.
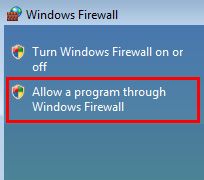
On Windows Vista PC, go to Control Panel then double click on Windows Firewall. On left pane click on “Allow a program through Windows Firewall”, a “Windows Firewall Setting” window should pop-up. In the “Exception” tab tick “File and Printer Sharing” checkbox and click ok.

Firewall exception setting
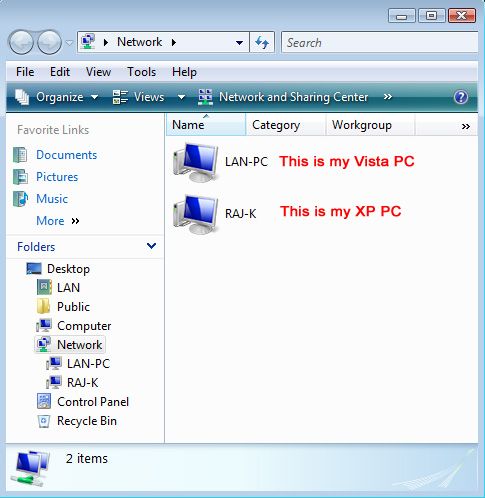
This is picture of my created network between Vista and XP PC where you can see both PCs. I have not mention folder sharing process in Vista because I think it is tough job to do. But if you think I should create this tutorial then request me and I’ll do that for you.
My own network view
"Access is denied" error message when you try to access a folder on LAN
Few visitors reported that they are unable to share LAN using above tutorial and after trying a lot I came to know that may be some security issue is not letting you to access PC from LAN. If you are able to ping from both PC and not able to see shared resources on the LAN then please follow this.
To resolve this problem, you must turn off Simple File Sharing, and then take ownership of the folder:
1. Turn off Simple File Sharing.
- Click Start, and then click My Computer.
- On the Tools menu, click Folder Options, and then click the View tab.
- Under Advanced Settings, click to clear the Use simple file sharing (Recommended) check box, and then click OK.
2. Right-click the folder that you want to take ownership of, and then click Properties.
3. Click the Security tab, and then click OK on the Security message, if one appears.
4. Click Advanced, and then click the Owner tab.
5. In the Name list, click your user name, Administrator if you are logged in as Administrator, or click the Administrators group.
If you want to take ownership of the contents of that folder, click to select the Replace owner on sub containers and objects check box.
6. Click OK.
You may receive the following error message, where Folder is the name of the folder that you want to take ownership of:
You do not have permission to read the contents of directory Folder. Do you want to replace the directory permissions with permissions granting you Full Control? All permissions will be replaced if you press “Yes”.
7. Click Yes.
8. Click OK, and then reapply the permissions and security settings that you want for the folder and the folder contents.
Source: Microsoft Support
Hope this will help to solve your problem. Thank you for reading me.
Useful Links
- How to share an internet connection on LAN?
If you have a fully functional LAN then net sharing is few click away, yes few clicks. I assumed that you have already a broadband connection and account configured on your PC. Just go to “My Network... - Setup LAN with Hub or Switch
Switch or HUB allows us to add more computers in our LAN or existing LAN. Switch or HUB is usually needed when we are networking more than two PCs. Why we need Switch or HUB only when networking more than two... - How to setup LAN with Crossover Connection
The process of crimping is so simple that, if carefully followed, a newbie can also do this with no difficulty. Because this is a crossover connection (i.e. PC to PC connection, no hub or switch will be used)... - How to assign IP Addresses to the client & server PC?
In this tutorial we will learn how to assign IP address to a computer. Before that I should make it clear that every PC will have its own unique IP address. Assigning same IP to other PC will give you...
© 2009 RAJKISHOR SAHU